Your Ip : 18.118.162.133, 172.71.255.54Your Location : , Your Status : Unprotected

About us

It takes more than a private internet browser to go incognito. We’ll make your real IP address.

Your IP Address:

  • 18.118.162.133, 172.71.255.54

Your Location:

  • ,

Your Status:

Unprotected

Get In Touch

Follow Us On:

Chromebook L2TP Setup

Setup CoverMeVPN on Chromebook with L2TP VPN

How to set up CoverMeVPN on your Chromebook using L2TP VPN? Follow our simple guide to ensure secure and private internet access. Chromebook L2TP VPN is the best solution for those who want to use a VPN on Chrome browser.

Chromebook L2TP VPN Setup - Step 01.

Open Chrome. Go to chrome://settings in a new tab. Go to ‘Add Connection’ → ‘Add private network…’

Chromebook L2TP VPN Setup

Chromebook L2TP VPN Setup - Step 02.

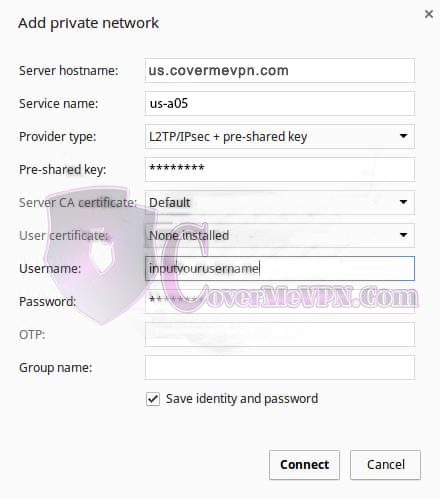
In the box that appears, enter the following:

  • Server hostname: Enter the full server name (ex: us.covermevpn.com). For the ‘Server address’ field, fill in the server IP from our Dynamic VPN and Chines list or Mini Dynamic  (dedicated VPN check our mail to you) according to your purchased package that you would like to connect.
  • Service name: Accept the default entry or create your own.
  • Provider type: L2TP/IPSEC + pre-shared key.
  • Pre-shared Key: 12345678
  • Server CA certificate: default.
  • User certificate: leave blank.
  • Username & Password: Your credentials for connecting to the VPN.
  • OTP: leave blank.
  • Group name: leave blank.
  • Note: Save username & password combination is optional.

Click ‘Connect’ and you will now connect to the specific server you have configured. You can create multiple networks for different servers by doing this process again.

Chromebook L2TP VPN Setup
Download the CoverMeVPN mobile app for iOS or Android.

Copyright © 2024. All Rights Reserved. CoverMeVPN

arrow up