Please Install And Activate Gtranslate Plugin
About us
It takes more than a private internet browser to go incognito. We’ll make your real IP address.
Your IP Address:
- 216.73.216.218, 104.23.197.4
Your Location:
- ,
Your Status:
Unprotected
It takes more than a private internet browser to go incognito. We’ll make your real IP address.
Unprotected
An iPad PPTP VPN setup with CoverMeVPN is a quick and easy way to boost your online privacy and access restricted content. This guide will take you through the easy steps to set up your iPad to connect to CoverMeVPN using PPTP. Whether you want to keep your data safe on public Wi-Fi or access geo-restricted content, this setup will make sure that your internet traffic is encrypted and private, giving you a safer browsing experience on your iPad.
Navigate to your home screen (or whichever page contains the ‘Settings’ app) by closing the current app, pressing the ‘Home’ button near the base of the unit, or by swiping to the ‘Spotlight’ search, and entering ‘Settings’. Launch the ‘Settings’ app with a single tap.
Once the ‘Settings’ app is open navigate to the ‘General’ category and open it with a single tap.
In the ‘General category find the VPN settings and open it with a single tap.
When the ‘VPN’ settings panel opens tap the ‘Add VPN Configuration…’ with a single tap.
Once the ‘Add Configuration’ panel opens tap the ‘Type’ which is defaulted to ‘IKEv2’ and tap ‘PPTP’ to change the protocol. Then fill in a descriptive title of your choice for the new VPN connection. For the ‘Server’ field below, fill in the desired host from VPN Account Details Emailed. When filling in the ‘Account’ and ‘Password’ fields, keep in mind our authentication system is case-sensitive. Do NOT enable the ‘RSA SecurID’ field between the ‘Account’ and ‘Password’ fields. For the ‘Secret’ field enter ‘covermevpn’ in all lower case. Confirm that the ‘Send All Traffic’ switch is in the ‘ON’ position. Finally, look for the blue ‘Done’ button in the upper-right corner of the panel and tap to commit
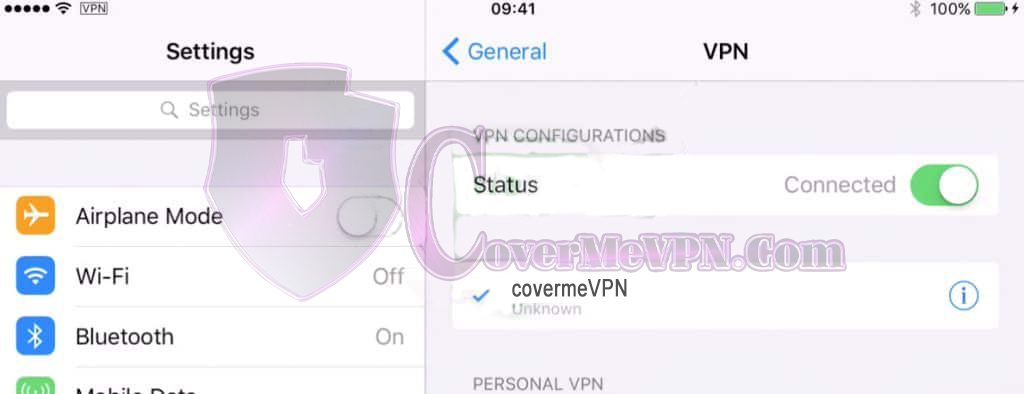
After saving, you will be brought back to the previous VPN connections page. To test the connection, look for the first item at the top of the category labeled ‘VPN Configurations’. After you have selected your connection, marked with a ‘check’, look for the toggle switch at the top of the frame, tap the toggle to enable a connection. Any error or warning messages will displayed next to ‘Status’. If you can’t seem to get beyond this point, confirm that you’ve entered your username and password correctly. Contact our support team for further assistance though our support center, making sure to provide any error or warning messages shown in the status indicator.
Once a VPN is saved in your device you can connect by tapping the ‘Settings’ app from your home page. Followed by tapping the ‘VPN’ option toggle near the top of the list. Note this will connect you to the VPN server with the check mark in the ‘VPN’ settings panel under ‘General’ Settings..