Your Ip : 34.231.247.254Your Location : , Your Status : Unprotected

iPhone L2TP Setup

iPhone L2TP VPN Setup

Step 01.

Navigate to your home screen (or whichever page contains the ‘Settings’ app) by closing the current app, pressing the ‘Home’ button near the base of the unit, or by swiping to the ‘Spotlight’ search, and entering ‘Settings’. Launch the ‘Settings’ app with a single tap.

Step 02.

Once the ‘Settings’ app is open navigate to the ‘General’ category and open it with a single tap.

Step 03.

In the ‘General category find the VPN settings and open it with a single tap.

Step 04.

When the ‘VPN’ settings panel opens tap the ‘Add VPN Configuration…’ with a single tap.


Step 05.

Once the ‘Add Configuration’ panel opens tap the ‘Type’ which is defaulted to ‘IKEv2’ and tap ‘L2TP’ to change the protocol. Then fill in a descriptive title of your choice for the new VPN connection. For the ‘Server’ field below, fill in the desired host from VPN Account Details Emailed. When filling in the ‘Account’ and ‘Password’ fields, keep in mind our authentication system is case-sensitive. Do NOT enable the ‘RSA SecurID’ field between the ‘Account’ and ‘Password’ fields. For the ‘Secret’ field enter ‘12345678’. Confirm that the ‘Send All Traffic’ switch is in the ‘ON’ position. Finally, look for the blue ‘Done’ button in the upper-right corner of the panel and tap to commit your settings.

Step 06.

After saving, you will be brought back to the previous VPN connections page. To test the connection, look for the first item at the top of the category labeled ‘VPN Configurations’. After you have selected your connection, marked with a ‘check’, look for the toggle switch at the top of the frame, tap the toggle to enable a connection. Any error or warning messages will displayed next to ‘Status’. If you can’t seem to get beyond this point, confirm that you’ve entered your username and password correctly. Contact our support team for further assistance though our support center, making sure to provide any error or warning messages shown in the status indicator.

Step 08.

Once a VPN is saved in your device you can connect by tapping the ‘Settings’ app from your home page. Followed by tapping the ‘VPN’ option toggle near the top of the list. Note this will connect you to the VPN server with the check mark in the ‘VPN’ settings panel under ‘General’ Settings..

Step 09.

Once the new connection profile is made, fill in your selected covermevpn server address in the ‘Server Address’ field – when choosing a server to connect to, geographical location may be a concern. Please reference our server mailed to you for more details. Fill your username in the ‘Account Name’ field – remember that our authentication system is case-sensitive, so a single miscapitalized letter in either your username or password will cause your connection to error out. Finally, locate the ‘Authentication Settings…’ button, and click to move on.

Step 10.

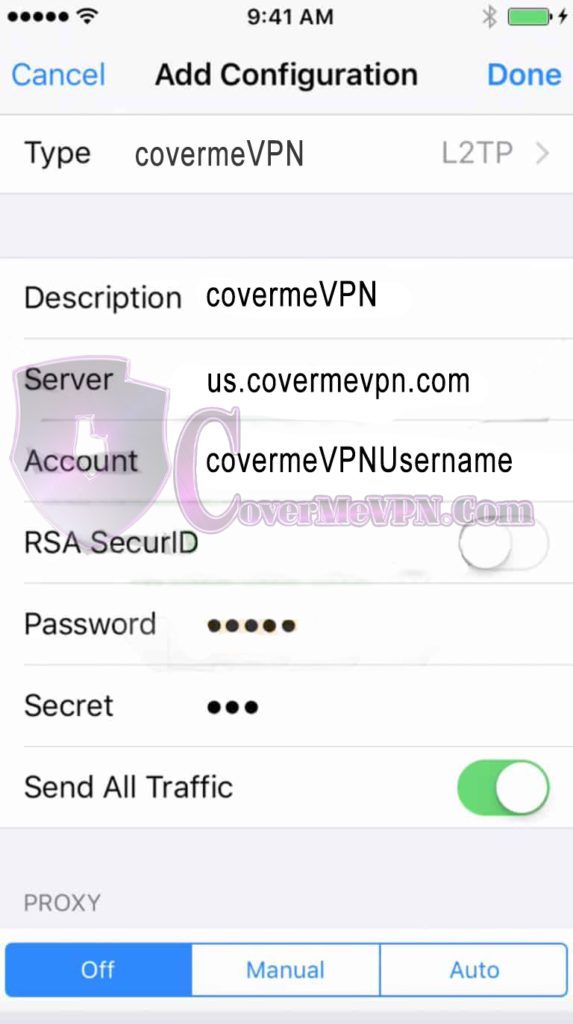
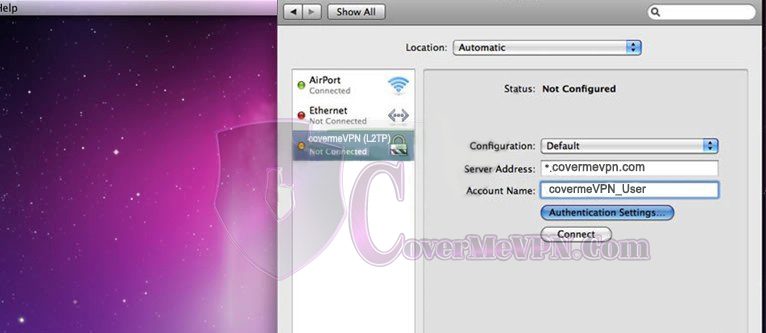
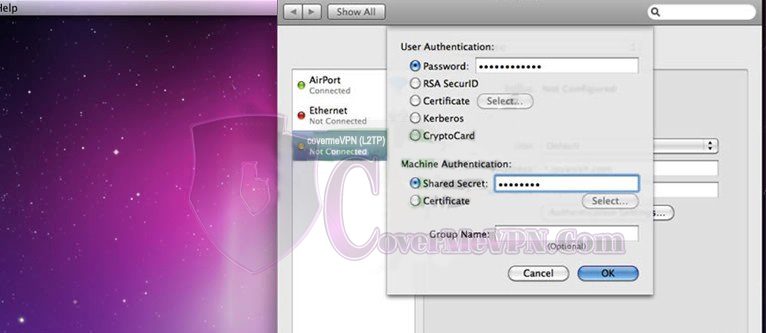
In the resulting dialog, enter your covermevpn password in the ‘Password’ field. As before, this field is case-sensitive, so double-check against the confirmation email we sent you at sign-up. In the ‘Machine Authentication’ category below, confirm that the ‘Shared Secret’ radio button is selected, and enter the covermevpn secret in the corresponding field – our pre-shared key is ‘12345678’, without the quotes. Click the ‘OK’ button to continue.

Step 11.

When you return to the previous menu, locate the ‘Advanced…’ button in the lower-right corner, next to the question mark icon. Click the ‘Advanced…’ button to continue.

Step 12.

In the ‘Advanced’ settings pane, locate the ‘Session’ category. Tick the third checkbox down, labeled ‘Send all traffic over VPN connection’, then click the ‘OK’ button in the lower-right corner to continue.

Step 13.

Find and tick the ‘Show VPN status in menu bar’ checkbox, located to the left of the ‘Advanced…’ button. Once this checkbox is ticket, you may commit all configuration options by clicking the ‘Apply’ button in the lower-right corner of the panel.

Step 14.

Test your newly created connection by clicking the ‘Connect’ button, just below the ‘Authentication Settings…’ button, and move on to the next step.

Step 15.

As the session to our server opens, watch the ‘Status:’ indicator at the top of the pane for any error or warning messages. If you are unable to obtain the ‘Status: Connected’ message, first confirm that you have entered your username and password – if you are still unable to connect, feel free to contact our support team, and include any relevant status messages.

Step 16.

Once the session has successfully connected, look for the ‘Status: Connected’ message with the ‘Connection Time:’ and ‘IP Address’ details below.

Step 17.

For a quick way to access your VPN session, locate the the indicator on the top of the screen – look for the session ‘Connect Time:’ indicator, and click to open a context menu. From this menu, you quickly start and stop your VPN session without navigating though the ‘System Preferences’ menu. Click out of the context menu, close the ‘System Preferences’ menu, and enjoy peace of mind that your online activities aren’t being monitored by prying eyes.

arrow up