Your Ip : 123.186.77.20Your Location : , Your Status : Unprotected

Linux PPTP

Ubuntu PPTP Setup

Step 01.

Point your cursor to the ‘Network Manager Indicator’ icon, located in the ‘Notification Area’ on the default desktop panel, in the upper-right corner. Click this icon, and mouse over the ‘VPN Connections’ item – click the ‘Configure VPN…’ item in the expanded menu to continue.

Step 02.

Confirm that the ‘VPN’ tab is active in the current panel, and click on the ‘Add’ button, located at the top-right end.

Step 03.

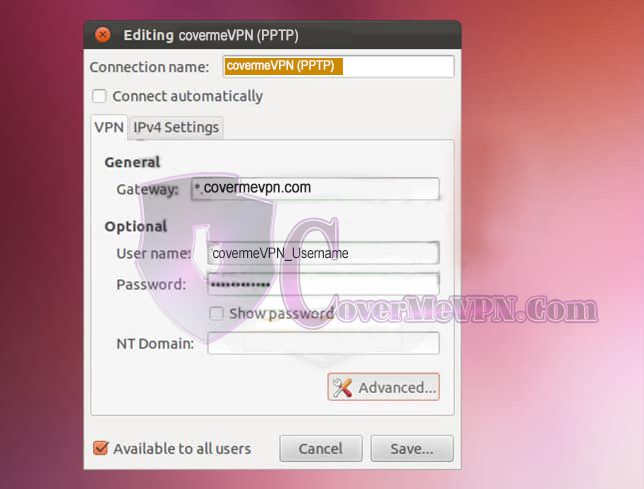
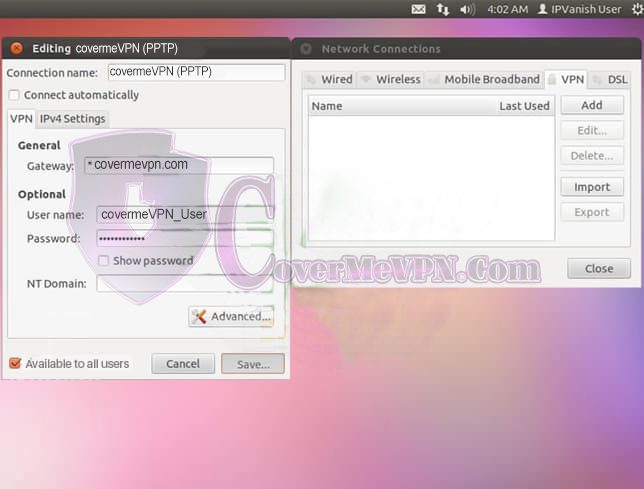
Fill in a descriptive title for the new connection in the ‘Connection name:’ field at the top, and should you wish to automatically enable this connection at login, tick the checkbox below labeled ‘Connect automatically’. Under the ‘General’ category, fill in the ‘Gateway:’ field with the VPNShazam hostname. For the ‘Server address’ field, fill in the server IP from our Dynamic VPN and Chines list or Mini Dynamic  (dedicated VPN check our mail to you) according to your purchased package that you would like to connect.

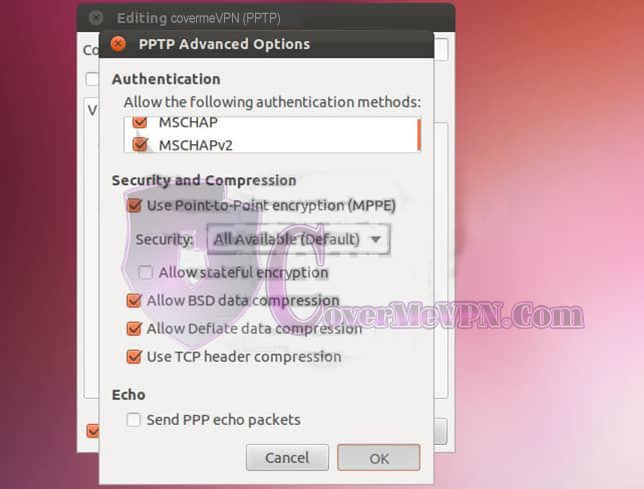
Below, look for the ‘Optional’ category, and enter your login credentials in the corresponding fields, if you prefer not to enter them manually at each login. Our authentication servers are case-sensitive, so take care when entering both your username and password. The ‘NT Domain’ field below should not be filled in. Next, look for the ‘Advanced…’ button near the bottom-right side of the panel, and click.

Step 04.

Under the ‘Security and Compression’ label, tick the checkbox labeled ‘Use Point-to-Point encryption (MPEE)’. Next, scroll through the frame labeled ‘Authentication’, and confirm that ONLY the MSCHAP and MSCHAPv2 boxes are ticked. Reference the screenshot for the correct settings. Finally, click the ‘OK’ button in the bottom-right corner of the panel to continue.

Step 05.

To commit the settings, first hit the ‘Save’ button in the bottom-right corner of this panel. Move your cursor back to the ‘Network Connections’ panel that was opened earlier, and hit the ‘Close’ button located at the bottom-right corner to continue.

Step 06.

Click on the ‘Network Manager Indicator’ icon, located in the ‘Notification Area’, and then navigate to the ‘VPN Connections’ as preformed in the first step. Now, in the expanded menu, you should see an additional item, labeled as the ‘Connection name:’ defined in step three. You may click this item to initialize the connection. If you declined to save your full credentials, you will soon see a dialog prompting you to enter your username and password. Remember that our authentication servers are case-sensitive, and enter your username and password to continue. Look in the upper-right corner of your screen for any error notifications that may appear as you connect.

Step 07.

The notification shown in the screenshot is what one would see upon successfully connecting to the VPN. If any other message is shown, feel free to contact our support team for further assistance, otherwise you can now have peace of mind that your online activities are secured from prying eyes.

arrow up