Your Ip : 35.86.148.151Your Location : , Your Status : Unprotected

Windows 7 PPTP

Windows 7 PPTP VPN Setup

Step 01.

Click the ‘Start’ or ‘Windows’ button in the lower-left hand corner of your screen, then navigate your mouse to the ‘Control Panel’ item and click.

Step 02.

Locate the ‘Network and Internet’ category, mouse over the heading, and click.

Step 03.

Point the mouse cursor on the ‘Network and Sharing Center’ item, and click.

Step 04.

Under the heading labeled ‘Change your networking settings’, click on the item labeled ‘Set up a new connection or network’.

Step 05.

With your mouse, select the third item in the list, labeled ‘Connect to a workplace’ – click the ‘Next’ button on the lower-right corner of the panel, to the left of the ‘Cancel’ button.

Step 06.

This menu may appear if you have previously configured any other custom connections in the ‘Network and Sharing Center’. If you do not see this panel, please move on to the next step. Otherwise, select the radio button labeled ‘No, create a new connection’, and continue forward with the ‘Next’ button on the bottom as before.

Step 07.

Mouse over the first item on this panel, labeled ‘Use my Internet connection (VPN)’, and click.

Step 08.

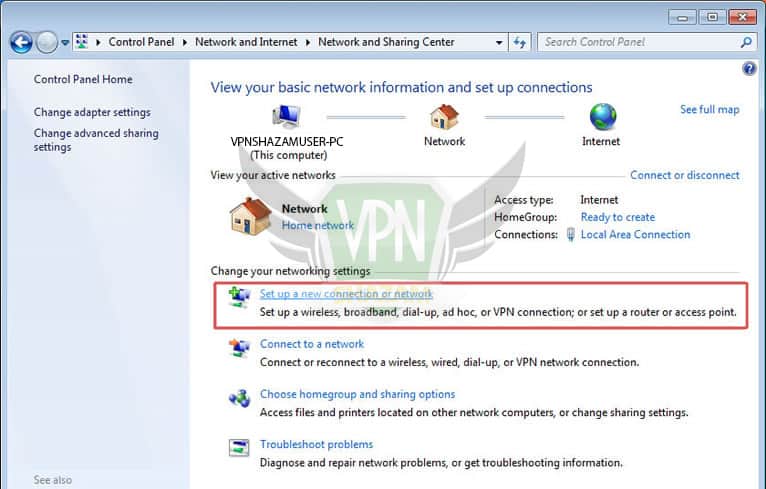
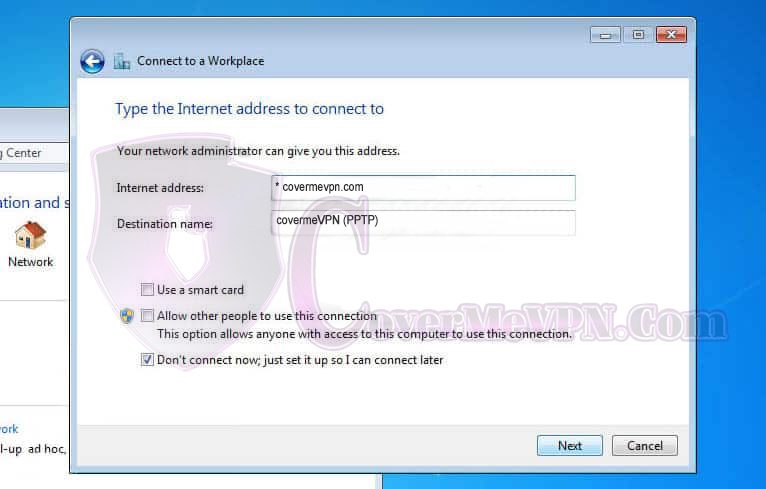
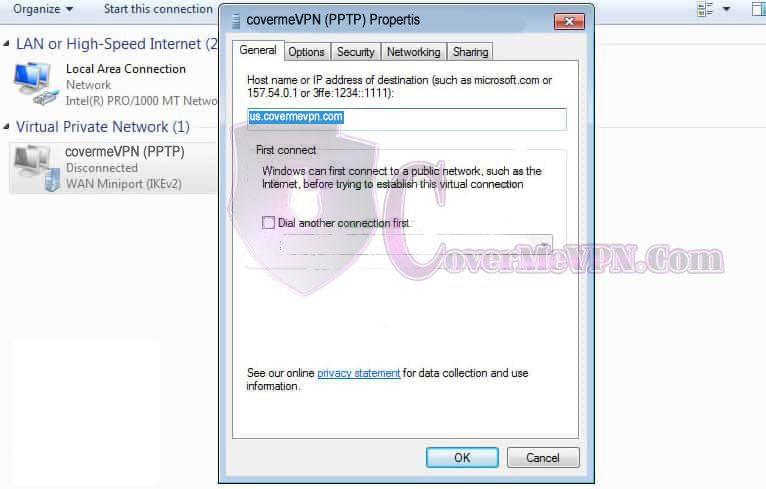
For the ‘Internet address’ field, fill in the covermevpn hostname which you’ve received from our available hosts.

For the ‘Server address’ field, fill in the server IP from our Dynamic VPN and Chines list or Mini Dynamic  (dedicated VPN check our mail to you) according to your purchased package that you would like to connect.

The address in the example is not valid, and must be replaced. For the ‘Destination name’ field, you may enter whatever you wish – this is a descriptor of the connection. Of the three un-ticked options below, only the last needs to be activated – check the box labeled ‘Don’t connect now, just set it up so I can connect later’. Move to the next step after clicking the ‘Next’ button.

Step 09.

Confirm your username and password from the confirmation email sent to you at sign-up, and enter both in the corresponding fields on this form – please keep in mind that our authentication system is case-sensitive, and even a single miscapitalized letter will prevent you from logging in. If you’d like to save your password, check the second checkbox below, labeled ‘Remember this password’. Do not fill the ‘Domain’ field. Click the ‘Create’ button in the lower-right corner to continue.

Step 10.

More configuration is necessary, so connecting now would potentially error out – you will need to mouse over to the ‘Close’ button on the lower-right corner of the panel and click to continue.

Step 11.

Back in the ‘Network and Sharing Center’, look for the link second from the top of the sidebar on the left side of the panel – the link is labeled, ‘Change adapter settings’. Click this link to continue.

Step 12.

Depending on your folder view settings, the order of your icons may be different than in the screenshot. Also, if the name of your connection differs from our example, keep that in mind. Look for the connection you made earlier, right click on the icon, mouse down to the ‘Properties’ item, and click your mouse to continue.

Step 13.

Confirm the hostname from our mail, and continue on to the ‘Security’ tab, clicking on corresponding tab indicator at the top of the panel.

Step 14.

Click the drop-down box labeled ‘Type of VPN’, and mouse or arrow-key down to the ‘Point to Point Tunneling Protocol (PPTP)’ selection. No additional configuration should be required on this page, however under the ‘Allow these protocols’ radio button, confirm that only the ‘CHAP’, and ‘MS-CHAP v2’ items are checked off. Please examine the screenshot as a reference.

Step 15.

Continue forward to the ‘Networking’ tab by clicking the tab of the same name near the top of the panel. In the center frame on this panel, uncheck the ‘TCP/IPv6’ and ‘File and Printer Sharing for Microsoft Networks’ items, as shown in the example. You may confirm your changes by hitting the ‘OK’ button on the lower-right side of the panel.

Step 16.

To test your settings and login credentials, point your cursor to the ‘Notification Area’, usually located near the lower-right hand corner of your screen. In this area, look for icon of a computer with a cord and plug along the side (see the example), and click it. Find the connection made earlier, the example using the name ‘covermevpn (PPTP)’, and click the ‘Connect’ button directly to the right.

Step 17.

Confirm your username for accuracy, then click the ‘Connect’ button in the bottom-left corner of this panel. After 30 seconds or so, confirm the connectivity status by opening the ‘Notification Area’ popup in your taskbar – you will be notified of any problems with the connection, in which case you will want to contact our support team. Once you have verified connectivity to the VPN, you can now have peace of mind that your online activities are secured from prying eyes.

arrow up